ShopDreamUp AI ArtDreamUp
Deviation Actions
Badge Awards
Description
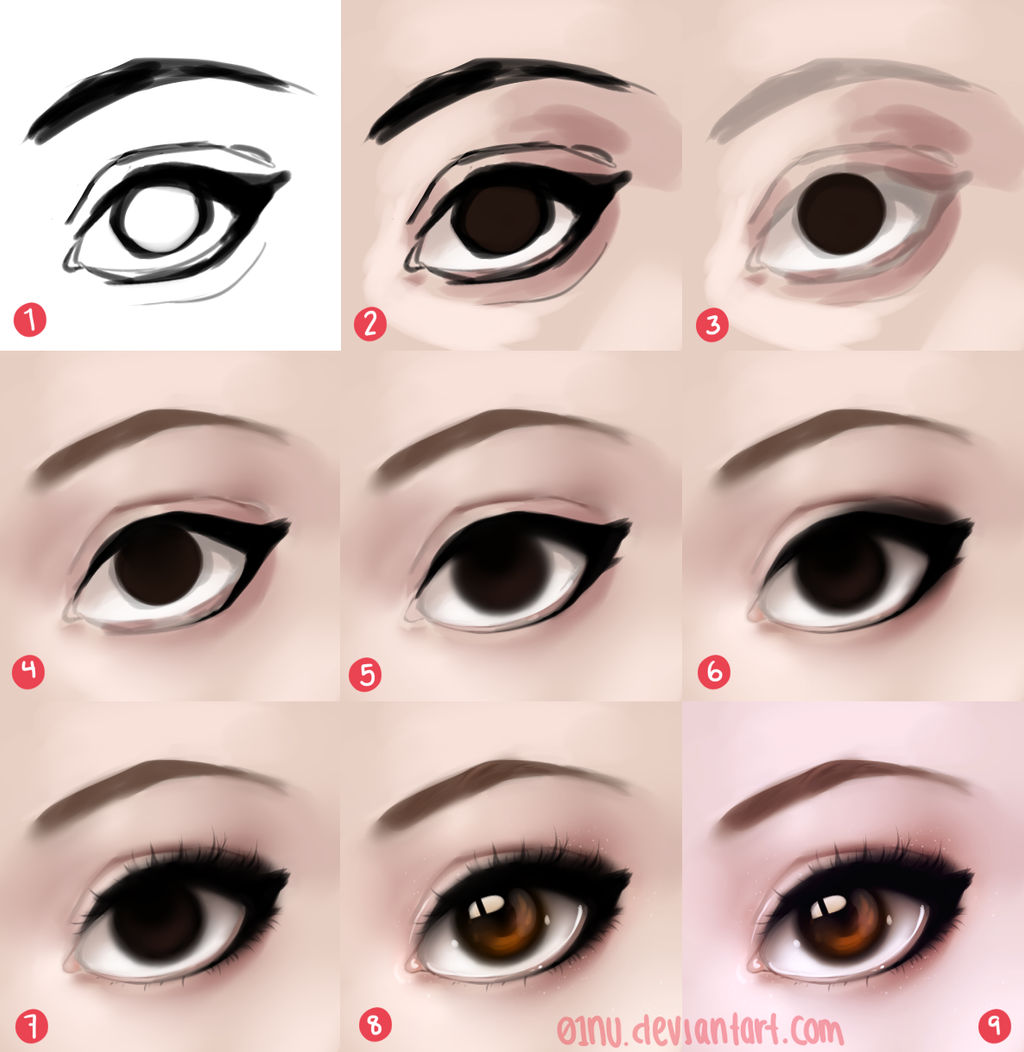
i am by no means an expert on eyes, but i do like to have fun exaggerating them : ) ive also always wanted to do a drawing process, something simple to start out would be best i figured. ^^
1. here, i started off with a rough sketch to get the proportions down. no specific colors, + doesn't have to be anything fancy because this layer's opacity is going to be lowered later anyways.
2. i put down basic messy colors and shadows/highlights around the eyes on a new layer. if you're not sure where to put them, look up some references! after just a few real life eye studies, it's pretty easy to at least SOMEWHAT get the hang of.
3. nothing much done here, i just lowered the opacity and merged all of the layers.
4. i did some of this on a new layer - draw the eyelash base/eyeliner over the sketch. i also blended the rough colors. in some spots i left the shadows sort of rigid for effect. i'm a fan of the super smooth look, but you can also do the blending pretty roughly.
5. i cleaned up the shadows and highlights some more, and also blurred the iris. it's not super noticeable since i chose a dark eye color, but i also blended the black of the eyelashes/liner into the iris so that it flowed more naturally.
6. i did very minimal shadow/highlight changes here. i also added black makeup to the outer edge of the eyelid and a pale pink/white to the inner part, as well as around the inner canthus (the little pink thing in the corner of the eye).
7. in this step all i did really was add eyelashes. which admittedly, i could use a bit of practice at myself orz.. but i'm sure you get the general idea
8. step 8 brings it all together!! i added brighter colors to the eyes as well as a bunch of highlights so make everything nice & shiny. i also did some simple dots on the highlighted areas of the skin for a quick bit of texture.
9. for the last step, i edited the colors and saturation in gimp (even though i also have PS..old habits die hard). this step is optional, but has a great overall effect.
Image size
1186x1218px 771.19 KB
© 2016 - 2024 01nu
Comments11
Join the community to add your comment. Already a deviant? Log In
Hi there! Thank you so much for you tutorial step by step! I just got myself a graphic tab and decided to follow tutorials to try to get some decent results. I wasn't rally satisfied with my eyes and then found your tutorial. It's the first time I get such a result! Thank you so much!!! 😘I used Paint Tool Sai.


![Nu's Current Hair Process!! [steps in description]](https://images-wixmp-ed30a86b8c4ca887773594c2.wixmp.com/f/550a50dc-c2f9-4d66-a5c1-19499da6f09c/dc8dsyw-7b7a4afe-00d3-49ae-97bf-5bd2a4ab0648.png/v1/crop/w_92,h_92,x_0,y_5,scl_0.055321707757066,q_70,strp/nu_s_current_hair_process____steps_in_description__by_01nu_dc8dsyw-92s.jpg?token=eyJ0eXAiOiJKV1QiLCJhbGciOiJIUzI1NiJ9.eyJzdWIiOiJ1cm46YXBwOjdlMGQxODg5ODIyNjQzNzNhNWYwZDQxNWVhMGQyNmUwIiwiaXNzIjoidXJuOmFwcDo3ZTBkMTg4OTgyMjY0MzczYTVmMGQ0MTVlYTBkMjZlMCIsIm9iaiI6W1t7ImhlaWdodCI6Ijw9MTIzMiIsInBhdGgiOiJcL2ZcLzU1MGE1MGRjLWMyZjktNGQ2Ni1hNWMxLTE5NDk5ZGE2ZjA5Y1wvZGM4ZHN5dy03YjdhNGFmZS0wMGQzLTQ5YWUtOTdiZi01YmQyYTRhYjA2NDgucG5nIiwid2lkdGgiOiI8PTEwMjQifV1dLCJhdWQiOlsidXJuOnNlcnZpY2U6aW1hZ2Uub3BlcmF0aW9ucyJdfQ.Y3uEoI4FgtoJwf9iMjU4MtCd7DWzvMBsz-nuHu4-skw)


